Pages

Friday, October 27, 2017

Give Thanks Mood Board Challenge #14

Give Thanks
Mood Board Challenge

Good morning Crafty Friends
Today is the start of a new Challenge.

Here is the Beautiful Mood Board


Isn't it fantastic???
Remember you can take anything from this Mood Board to inspire you whether it be something in a photo or a color or even the theme "Give Thanks"

To inspire you today I have made this Beautiful Thank you card using Victorine Originals Thank You sentiment stamp.


I started with a white cardstock base. 
Found some wonderful paper by Prima.
And it all fell together from there. The sentiment Thank You was stamped on that carbon paper you get in a package. 
Yeah. I kept that. 
I wrinkled it a little more to give it a distressed look.
I also distressed a white paper to add layer to my card using Tim Holtz distress ink.
I added a flower, some twine, feathers and a cute butterfly sticker to bring it all together.
I hope to have inspired you today to join in our challenge over at SumMoreFun/Victorine Originals & Raisin Boat stamps blog.


Our PRIZE has gotten BIGGER too!!
Woot!!!
And if you use Victorine Original stamps or Raisin Boat stamps it gets DOUBLED.
How exciting is that???

If you want to order, and double your prize in the challenge: Use code AMYS FRIENDS @ checkout for Free shipping!!!
Shop now!!

Now head on over to the blog and look at my DT sisters amazing project too.
Dont forget to link up your creations.
I can't wait to see what you made.


Hugs
Amy

Monday, October 23, 2017

Halloween Witch Hat decoration

Halloween Witch
Hat Decoration

Good Morning crafty friends
I'm up on the Victorine Originals blog today with a mid-week challenge inspiration and a fun decoration for Halloween.
A cute Witches Hat


I started out by using a kit for a small hat
And as I was crafting along, everything ended up tossed to the other side of my table.  It wasn't going together right or what I really had in my mind to create.
So all I kept was the shape for the top of the hat.  I then chose some cute paper from my stash and made the rim of the hat.
I used Victorine Originals Halloween kids stamp set and let my son pick which one to use. He chose the reaper kid.


I stamped this image on two different colors of paper and colored them both.
I then fussy cut them out
I did this because I wasnt sure how either of them would look against the colors.
So this way I had more options.
I used my punches and punched out a spooky tree.
I also found some fibers in my stash to go around the bottom.
I added my colored stamp and liked the white color better.
I also punched out a round peice of paper, distressed it to look like the moon and added a bat.
Once everything was done, I arranged everything until it fit.
I also added the sentiment Boo!


Dont forget our Mood Board Challenge
Thats still going on right now.
Here is our Mood Board


Fun right?
Get inspired from this board, a photo, object, color, the theme or even my project today.  Then go over and link up your project. You have until this Friday!!
Cant wait to see your creations.

Thank you for visiting today.
Hugs
Amy


Products used:
Victorine Originals: Halloween kids stamps
American Crafts: Witch hat place cards( used just the black rim), Halloween 6x6 collection, chalk markers.
Bo Bunny: Fright Delights spiders
Fiskars: Tree punch
Spectrum Noir: color pencils
Artists Loft: color pencils
Tim Holtz: Distress Ink


Thursday, October 19, 2017

Black and White Halloween

Black and White
Halloween

Hey there Crafty Friends.
I'm here today to share with you a mixed media canvas I made using the inspiration of a challenge photo. 
Its been a while since I took on a challenge
And I have to admit it felt great!!!

But it was a little tricky. 
I had to look at the photo and get something from it that inspired me. 
That wasnt the tricky part, 
because I love Halloween. I love things with skulls and flowers and butterflies too. 
So I knew these things had to be involved somehow. 
But the photo to me screamed a new demention of sorts or dream.. Almost like your stuck in a haunted place, your creative mind is trying to find the good things there, the inspiring things but you're still looking for a way out.
Here is my canvas


I found all kinds of inspiration in this photo


The tricky part was keeping everything Black and White.
You really want to add a splash of color somewhere. 
Its harder than you think. 
My zipper represents the way out. 
My skull was a wood skull unfinished.
I painted it black and then white, using DecoArt Crackle paint and then used black to shade in some areas to make it look more scary and real.
I used texture and Prima flowers as well as other flowers from my stash.
I also used numbers to form a clock around the canvas to make it seem like its falling apart. I made these using a stencil and modeling paste, once dry, I carefully moved them in place. 
The #13 represents Friday the 13th.
I used Creative embellishments Butterfly and Triangle pieces.
I painted them black and added white for details of the butterfly and marks on the triangle.

Thanks for stopping by. 
Hugs
Amy


Friday, October 13, 2017

Mood Board Challenge #13 Halloween Altered Bottle

Mood board challenge #13
Halloween

Altered Wine Bottle

Today is the start of a new challenge over at Victorine Originals.
The best thing about this challenge is the fun things of Halloween
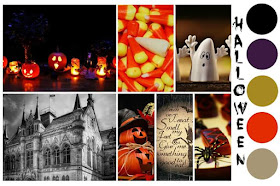
Here is our Awesome and fun Mood Board


Such a spooky cool board.
Well today I decided to step outside the box once again and alter a bottle. 
I used Victorine Originals
Oh.. These are the cutest stamps for Halloween!!! 
Here is my bottle


I am adding a few different pictures as the bottle looks different in different light. 
As you know, Halloween is always a little darker, so it only seem fair to add a few pics using flash in the dark, right? 


I started out by cleaning the label off the bottle. I then let it dry over night. 
I used 3 different colors of spray paint.
I started with black, then purple and blue.
I kept alternating the colors.
I did two coats and let dry.
(Note to self: always check the inside of the bottle to make sure the paint is dry before Altering. This will help you from pouring paint in your lap while using a stencil)

Ok, I laughed too. But I did have a nice dark stain on my leg from the paint for a bit and not to mention those poor pants. 
Oh well. 

I started by using the mummy and ghost stamp. Its not as easy to stamp on glass as you think. 
Your stamp will slide and since the bottle is curved, you have to hit it just right. 
I've learned if you start with the edge farthest away from you touch it to the bottle and go in a rolling motion towards you, it tends to help. 
But, I'm not gonna lie, I stamped each image about 6 or 7 times before it finally was right. 
Baby wipes are my best friend in these moments. 
After my images were on, I took my stencil and taped it to my bottle.
I then took 2 different colored inks and stamped on the stencil. 
I also added a few other spots just holding the stencil. 
Its times like these, you would like to have more hands.  But I managed.
I then added a cool chain and some feathers and of course a sentiment. 
This sentimemt is in the Halloween Kids stamp set.
So cute, right?


Heres the board again


Remember you can use anything from this board to get inspiration.
Use a photo, an item in the photo, a color or two or three. Or even the theme
Halloween.
Plenty to choose from and I bet you have been making Halloween creations already.
So what are you waiting for? Go link up your new projects now.
You have 2 weeks.

Thanks for stopping by
Hugs
Amy

Products used:
Victorine Originals: Halloween Kids Set
Ranger-Dylusions Triangle stencil
Bo Bunny: Fright delight sticker combo
(stamped sentiment on this)
Prima: chalk ink
Archival pearlescent sky blue
Spray paint, feathers and chain from my stash.


Monday, October 9, 2017

Mixed Media Fall Tag

Mixed Media Fall Tag

Hey Crafty friends
Im here today with a neat tag I made using
Victorine Originals
Bird Cages stamp 74843-K


I recieved some crafty fun mail with new products I was dying to use.
So I had to jump right in and play.
We are always excited when we recieve Happy mail.
I started off by using Gesso on my tag to seal it.  I then added DecoArt modeling paste using a stencil to get a wonderful texture.
I painted using my new Prima-Finnabair art alchamy acrylic paint and used their Opal magic wax to color and bring out the texture.
I stamped only using one of the bird cages from this stamp.
I was trying to be a little different.
These Bird cages are Beautiful.
I distressed the edges of the paper around the bird cage by ripping the paper and then adding Tim Holtz distress Ink.

I used my punches to punch out
the leaf shapes.
The one leaf you have to attach to a solid paper for the backing. I decided to wrap a peice of wire around it to add a new touch.
I cut the butterfly out of a banner I had.
Added a lil color and gems to make it sparkle. I then added everything to my tag and arranged them. I added flowers to make it pop and be more fall like.
The flowers were a perfect color.


I am also up on the Victorine Originals blog today with my tag too. So head on over amd leave some comments there too.
My tag can also be used as more inspiration for our challenge going on right now.

Here is the amazing and fun Mood Board


Isnt it fun?
You can use anything to inspire you from the board.
A picture, a color, an object in a picture or even the theme we added to this one, Harvest.
So much to inspire you
Go over and join in the fun HERE.
Link up your project by Friday

Thanks for stopping by
Hugs
Amy

#Victorineoriginals #MixedMedia #Handmade #Finnabair #Prima #Handmade #Fall #Tag

Products used:
Victorine Originals: Bird cages 74834-K
DecoArt: Modeling Paste
The Crafters Workshop: Mini Specimen stencil
Prima: Flowers, Timeless memories 6x6 pad
Prima/Finnabair: art alchamy acrylic paint.          sparks- Dragons eye & Bitterfly spells
        Opal Mafic Wax - Green Brocade &                  Royal Robes
Ek Success: Leaf punch
Fiskars: Leaf punch
Wire, gesso and butterfly from my stash.