Pages

Friday, December 22, 2017

New Years upcycled Clock SumMoreFun Mood Board Challenge#18

SumMoreFun
Mood Board Challenge#18
New Year's
Upcycled clock

Hey Crafty friends
We are back again with another Challenge for you over on the SumMoreFun blog.

Here is our Mood Board


You can take anything from this Board to inspire you. Something from a picture or even one of the colors. 
The theme is New Years. 

Here is what I came up with to inspire you to join in.


I 've had this clock for months sitting in my craft room waiting for the perfect project.
I used Victorine Originals Clock Minutes.

This is a working clock.
So the first thing I had to do was take it apart.
I only had to take the lens and front cover off and then the hands.
I then painted the inside.
And painted the hands purple.
I punched out a circle using Fiskars Circle
 Punch. The paper is from DCWV.
I stamped my image on the circle and attached it to the center of the clock.
My next step was altering and upcycling the outside of the clock.
I used 2 different kinds of Gesso. After they dried I used whipped spackle to add thickness and texture to my background.
Allowing to dry.


I came back and added more texture with stencils and whipped spackle.
Once that layer dried, I came back and started painting and blending my colors.
I then used my stamped image again and stamped a few times in black ink.


I hope I was able to inspire you to try something new.
Dont forget to join in the Challenge.
You have 2 weeks.
Link up your creations up here.

Merry Christmas and Happy New Year!!!

Thanks for stopping by
Hugs
Amy
Products used:
Victorine Originals: Clock Minutes stamp
DecoArt: White Gesso
Art Basics Finnabair: Heavy Gesso White
Faber Castell: Whipped Spackle
Prima-Finnabair: Art Alchemy Acrylic Paint
-Metallique Crocus Fields-Emerald Green
-Sparks-Dragons eye
Opal magic:
-Green Brocade
-Royal Robes
The Crafters Workshop: mini specimens
Alphabet stencil
DCWV: Far East Matstack
Fiskars: Large Circle punch
Versafine: oxyz black ink pad

Tuesday, December 19, 2017

Oriental Trading winter Ornaments

Winter Ornaments

Oriental Trading Co.

Hey there crafty friends.
Today I'm sharing with you some ornaments I made using some supplies sent yo me from Oriental Trading Co.
The theme is winter. And this time of year ornaments are everywhere.
I wanted to make them my own. Something I would enjoy year after year.
Here is what I came up with


Aren't they pretty?

I started out with the plastic tear drop ornaments. You can fill them with whatever you like.
I filled a few with the pretty gems I was sent.
I made a dove for the middle of one and used butterflies on top of a few.
I also decided to do some different.
I wrapped one in tissue paper and Mod podged it to seal it.
Another one I used Gesso to cover it and add texture. Oriental also sent me out some metal gears. So I painted them using DecoArt paints and attatched them to the outside.


They definently have a winter feel. I am going to put them on my white Christmas tree. Next year I may hang them from the mantle.

I love that I was able to create my own ornaments the way I wanted them.
Thats what is so great able Oriental Trading company. They have so many different supplies to DIY.

I hope I was able to inspire you today.
If you want to get your own supplies I included the links below.

Merry Christmas everyone!!
Thank you for stopping by.
Hugs
Amy


Links:


Disclaimer:  Oriental Trading has sent me products to review but all opinions are my own.


Monday, December 18, 2017

Tag Your Gifts Christmas

Tag Your Gifts
Christmas

Hey there crafty friends. Today is Monday so that means its my day to take over the blog over at SumMoreFun. I wanted to share my Christmas tags with you. 
I have two tags to show you. 


I love the way they turned out. 
Dont you? 


I used Victorine Originals Dear old Santa and the Peace sentiment.


For this one I used Victorine Originals Swirl Trees, snowflake stamps (here and here) and the Let it Snow sentiment.

I used Ken Oliver Color Burst for my backgrounds. While waiting for them to dry, I heat embossed the sentiments as well as the trees.  I stamped my Santa on a piece of canvas, then frayed it around the image.
I used Tim Holtz distress Ink on the ends to distress it a bit. 

I added twine behind my santa and the frayed canvas pieces behind the trees.
On the tree tag, I stamped in white using the snowflakes directly on the tag. 
I added a few things from my stash too.

I hope you enjoyed my tags and maybe I was able to inspire you to make your own or join in our challenge thats going on right now. 
Here's the mood board


This challenge ends on Thursday. So get your entries in HERE for your chance to win. 
I cant wait to see your creations. 

Thanks for stopping by
Hugs
Amy


Products used:

Santa Tag
Victorine Originals: Dear Old Santa, peace sentiment.
Ken Oliver Color Burst Burnt Umber
Creative embellishment: diamond chipboard

Tree Tag
Victorine Originals: swirl tree, snowflakes, Let it Snow sentiment.
Ken Oliver Color Burst Blue
Bo Bunny snowflake


Sunday, December 10, 2017

Oriental Trading plaid cabin Christmas

Oriental Trading Company
Cabin Christmas
Buffalo Plaid
Collection and More!

Hey crafty friends.
Im here today to share with you a fun Cabin Christmas set up I made using some things Oriental Trading Company sent to me.

Neat, isnt it?


I started off making a wreathe.
I wanted it to look like it came from a hunting cabin.
Using a metal wreathe, burlap, pinecones and  these really cool antlers from Oriental Trading I was able to put together a nice wreathe to hang on the wall.
This wreathe could hang all year long if I wanted.


I set up a scene in my living room.
The cute Christmas totes from the plaid collection are great for those throw blankets and pillows to pull out while watching Christmas movies.
The cool Plaid and Deer head pillows are a great addition to any Christmas event.
I love them. Perfect size and so comfortable.
 The wooden candle holders also added to the cabin look and feel.
And I cant forget the adorable
Reindeer!!!
He is just too cute!!❤

You can go shopping at the links below and get so many things to add to this type theme for Christmas.
A very home and cozy feel.


Links:
http://www.orientaltrading.com/holidays/christmas-a1-550904.fltr

http://www.orientaltrading.com/buffalo-plaid-a1-90000+2884-1.fltr

http://www.orientaltrading.com/holidays/christmas/christmas-craft-and-hobby-supplies-a1-550936.fltr

Disclaimer:  Oriental Trading has sent me products to review but all opinions are my own.


I hope you enjoyed this post!!
Maybe I inspired you to make your own wreathe or set up a different scene for your Christmas.
Thank you Oriental Trading Co. For allowing me to preview these products for you. I love them.
Hugs
Amy


Friday, December 8, 2017

All Decked Out SumMoreFun Mood Board Challenge #17

All Decked Out
Mood Board Challenge
#17

Hey there crafty friends. Today is the start of a new challenge.
Get your crafty Mojo going and join in with us at SumMoreFun!!!
Here is the amazing Mood Board


So fun right?
You can get your inspiration from one of the pictures or a color if you choose. You also have the theme to inspire you too.

Everyone is making Christmas crafts right now. Link yours up and join in to win!!!
Use Victorine Originals or Raisin Boat Stamps and you could double that prize!!

So lets get to my inspiration for you.
I made a Christmas canvas!
Using the Large Dear old Santa from Victorine Originals.


I started with a burlap canvas.
I added gesso to the sides to make it look like snow.
I stamped my image on brown cardstock.
Then distressed it using Tim holtz distress ink.
I added my layers of paper and moved them around until I was happy with the way it looked.
I also stamped the scroll image which is also from Victorine Originals.
I wanted it to look like Santa's list.
I added metal snowfalkes and a key. Adding wooden veneer cut outs and christmas peices from my stash.

I hope I was able to inspire you today.
Now head on over to SumMoreFun's blog and link up your projects, canvas art, cards, ornaments, decor. Anything as long as you were inspired by one items from the mood board. Easy, right?

Thanks for stopping by
Hugs
Amy


Products used:
Victorine Originals: Large Dear Old Santa
Bo Bunny: paper
Tim Holtz: distress ink
Kaiser Craft: wood veneer


Monday, December 4, 2017

Snow Globe Fun Christmas Card

Snow Globe Fun
Christmas Card


Hey Crafty friends.
Im up on the SumMoreFun blog today to share a little fun Snow GlobeCard with you.
I used Victorine Originals Snow Globe Stamp, Let it Snow sentiment and the cute Twins stamp.


These two are so cute.


I stamped my Snow Globe image on white cardstock and cut it out.
I used a punch to cut out the middle, leaving enough to look like snow building up around the inside.
I then punched out the blue vinyl to add to the back.
Stamping my Twin images, I decided to fussy cut them out too and added them to the center.
I added a lil glitter paste to the bottom of them to make it look like the snow settling on the bottom before you shake it.
I added the Let It Snow sentiment because it fit so well.


Dont forget to join in our Mood Board Challenge going on right now. 


Link up your projects by Thursday for your chance to win. And if you use Victorine Originals or Raisin Boat Stamps the prize doubles. 
How awesome is that?

I hope I was able to inspire you today
Thanks for stopping by
Hugs
Amy


Products Used:
Victorine Originals: Snow Globe, Twins, Let it snow sentiment.
Faber Castell: Glass bead Glitter Gel
American Crafts: Black chalk Marker
Super Doodle: Gel Pens
Plaid: Paper Mod Podge
Vinyl and color pencils from my stash. 

Friday, November 24, 2017

Let it snow mood board challenge #16

Let it snow
Mood board challenge
#16

Good Morning Crafty Friends
Today, we have a New Mood Board Challenge up on the SumMoreFun blog.

Here is our Mood Board


Im in love with this Board!!!
Isn't it Gorgeous???

Remember you can use anything from the board that inspires you. Wether it be something in a picture, one of the colors or the theme..."Let it Snow".

Here is my inspiration for you...


If you know me, I had to get back to my canvas work. Theres just something that itches at me to do so. 
So today I bring this beautiful piece to light. 
Using the Elk Silhouette in snow Stamp from Victorine Originals. 
First I stamped my image using brown ink.
I then went back with the brown ink and a paint brush to add more hair like details to the elk. 
I added texture by using stencils and modeling paste as well as whipped spackle.
After letting it dry, I then used DecoArt media paints to bring the stencils to life.
I added a teal color to match the mood board and because I was looking for more of a winter/Frosty look and its really my favorite color to work with. 
No secret there. 😀

I was trying to also achieve a woodsy feel.
This is why I chose the leaf stencils.
I went back with white to highlight the bigger leaves.
I also used Prima Finnabair Mica Powder and finished with Prima Opal Magic wax on the smaller leaves
I hope I have inspired you today to join in with our challenge.

Make sure you head over to the SumMoreFun blog and link up your Christmas or wintery projects for your chance to WIN!!!!
And remember if you use Victorine Originals or Raisin Boat Stamps the prize is  bigger!!!

Thanks for stopping by
Hugs
Amy

Products used:
Victorine Originals: Elk in snow stamp
DecoArt: Media Acrylic paints, modeling paste, gesso
Faber Castell: Whipped spackle
Prima-Finnabair: Mica Powder and opal magic wax
Stencils: Plaid- leaves and craft store brand leaves

Monday, November 20, 2017

Vintage Snowman

Vintage Snowman


Hey crafty friends,  today is my day to take over the SumMoreFun blog.
I decided to use the Happy Snowman stamp from Victorine Originals!!
He is just too cute and since I love the way vintage snowman look.
Those would be the colors I went with.
Heres my Card


I started out by stamping my image in brown. I then colored my image with Spectrum Noir colored pencils. But only the hat and the scarf. 
I then added ink to the sides to give a distress look. 
I chose my colored papers to match and layered them. 
I also added the sentiment Merry Christmas
Using rub ons.

Get your Happy Snowman Here.

Dont Forget our Mood Board Challenge thats going on right now too.
Link up your projects by Thursday to be in it to WIN!!!

Another look at our Mood Board

Link up your project here.

Thanks for stopping by
Hugs
Amy

Products used:
Victorine Originals: Happy Snowman ⛄ stamp
Spectrum Noir: colored pencils
Memento: rich mocha ink pad
Prima: 6x6 papers
Bo Bunny: Elf Magic paper

#VictorineOriginals #SumMoreFun #Prima #SpectrumNoir # Memento #HappySnowman

Friday, November 10, 2017

All tied up Mood Board Challenge #15


Mood Board Challenge
#15
All Tied up

Good morning friends,
Today is the day for a New Challenge
Up on the SumMoreFun Challenge blog
Woot!

Here is our Mood Board


Isn't it lovely?

Today I made a gift bag for you using this adorable snowman stamp


I stamped the snowman all around my
pre-made bag wrapping them all the way around.
I then added tissue paper and tied twine around it to keep it closed from sneaky eyes. I also added a wooden tag which I stamped as well.
This was a quick project to add a little handmade to a gift.
I love using stamps to create my own gift wrap and bags.
Now its your turn.

Christmas time is on its way
Are you making cards for your friends and family or decorations for your home?
Link them up to our challenge for your chance to win!!!

Remember you can use anything from our Mood board that inspires you. Something from a picture, one or two of the colors or even our theme "All Tied Up"

Thanks for stopping by
Hugs
Amy


Monday, November 6, 2017

Burlap Thank you

Thank You
Burlap bag and Tag

Hey there crafty friends. I'm
 taking over the Victorine Originals-SumMoreFun blog  to share with you this neat Burlap bag for a Thank you gift.
I also made a tag to go with it.
I used Victorine Originals Thank you Sentiment


Here is a close up of the tag using the same stamp.

I found these cute burlap bags and thought it would be neat to try to stamp on them.
So thats what I did.
It took a few times stamping for the ink to really show. Luckily I now have a stamp platform to help keep the stamp lined up.
If you dont have one, thats ok. You can also use a chalk marker or permanent marker after you stamp the image first to get it to brighten up.
For my tag, I used a pre-cut tag and covered it with a pretty paper Then added a smudge of fall color using ink.
I stamped my image on brown paper and added a few of my own handmade flowers and a cute leaf charm to finish it up.

Dont Forget
our mood board challenge
 thats going on right now on the Victorine Originals- SumMoreFun blog.
"Give Thanks"

Here's our wonderful mood board

Remember you can use anything from this board that inspires you.
Something in the pictures or a color.
Cant wait to see what you create! link up here.

Hugs
Amy


Products used:
Victorine Originals: Thank you Sentiment
Tim Holtz: distress ink
Prima: 6x6 paper
Flowers: I made
Charm from my stash. 

Friday, October 27, 2017

Give Thanks Mood Board Challenge #14

Give Thanks
Mood Board Challenge

Good morning Crafty Friends
Today is the start of a new Challenge.

Here is the Beautiful Mood Board


Isn't it fantastic???
Remember you can take anything from this Mood Board to inspire you whether it be something in a photo or a color or even the theme "Give Thanks"

To inspire you today I have made this Beautiful Thank you card using Victorine Originals Thank You sentiment stamp.


I started with a white cardstock base. 
Found some wonderful paper by Prima.
And it all fell together from there. The sentiment Thank You was stamped on that carbon paper you get in a package. 
Yeah. I kept that. 
I wrinkled it a little more to give it a distressed look.
I also distressed a white paper to add layer to my card using Tim Holtz distress ink.
I added a flower, some twine, feathers and a cute butterfly sticker to bring it all together.
I hope to have inspired you today to join in our challenge over at SumMoreFun/Victorine Originals & Raisin Boat stamps blog.


Our PRIZE has gotten BIGGER too!!
Woot!!!
And if you use Victorine Original stamps or Raisin Boat stamps it gets DOUBLED.
How exciting is that???

If you want to order, and double your prize in the challenge: Use code AMYS FRIENDS @ checkout for Free shipping!!!
Shop now!!

Now head on over to the blog and look at my DT sisters amazing project too.
Dont forget to link up your creations.
I can't wait to see what you made.


Hugs
Amy

Monday, October 23, 2017

Halloween Witch Hat decoration

Halloween Witch
Hat Decoration

Good Morning crafty friends
I'm up on the Victorine Originals blog today with a mid-week challenge inspiration and a fun decoration for Halloween.
A cute Witches Hat


I started out by using a kit for a small hat
And as I was crafting along, everything ended up tossed to the other side of my table.  It wasn't going together right or what I really had in my mind to create.
So all I kept was the shape for the top of the hat.  I then chose some cute paper from my stash and made the rim of the hat.
I used Victorine Originals Halloween kids stamp set and let my son pick which one to use. He chose the reaper kid.


I stamped this image on two different colors of paper and colored them both.
I then fussy cut them out
I did this because I wasnt sure how either of them would look against the colors.
So this way I had more options.
I used my punches and punched out a spooky tree.
I also found some fibers in my stash to go around the bottom.
I added my colored stamp and liked the white color better.
I also punched out a round peice of paper, distressed it to look like the moon and added a bat.
Once everything was done, I arranged everything until it fit.
I also added the sentiment Boo!


Dont forget our Mood Board Challenge
Thats still going on right now.
Here is our Mood Board


Fun right?
Get inspired from this board, a photo, object, color, the theme or even my project today.  Then go over and link up your project. You have until this Friday!!
Cant wait to see your creations.

Thank you for visiting today.
Hugs
Amy


Products used:
Victorine Originals: Halloween kids stamps
American Crafts: Witch hat place cards( used just the black rim), Halloween 6x6 collection, chalk markers.
Bo Bunny: Fright Delights spiders
Fiskars: Tree punch
Spectrum Noir: color pencils
Artists Loft: color pencils
Tim Holtz: Distress Ink


Thursday, October 19, 2017

Black and White Halloween

Black and White
Halloween

Hey there Crafty Friends.
I'm here today to share with you a mixed media canvas I made using the inspiration of a challenge photo. 
Its been a while since I took on a challenge
And I have to admit it felt great!!!

But it was a little tricky. 
I had to look at the photo and get something from it that inspired me. 
That wasnt the tricky part, 
because I love Halloween. I love things with skulls and flowers and butterflies too. 
So I knew these things had to be involved somehow. 
But the photo to me screamed a new demention of sorts or dream.. Almost like your stuck in a haunted place, your creative mind is trying to find the good things there, the inspiring things but you're still looking for a way out.
Here is my canvas


I found all kinds of inspiration in this photo


The tricky part was keeping everything Black and White.
You really want to add a splash of color somewhere. 
Its harder than you think. 
My zipper represents the way out. 
My skull was a wood skull unfinished.
I painted it black and then white, using DecoArt Crackle paint and then used black to shade in some areas to make it look more scary and real.
I used texture and Prima flowers as well as other flowers from my stash.
I also used numbers to form a clock around the canvas to make it seem like its falling apart. I made these using a stencil and modeling paste, once dry, I carefully moved them in place. 
The #13 represents Friday the 13th.
I used Creative embellishments Butterfly and Triangle pieces.
I painted them black and added white for details of the butterfly and marks on the triangle.

Thanks for stopping by. 
Hugs
Amy


Friday, October 13, 2017

Mood Board Challenge #13 Halloween Altered Bottle

Mood board challenge #13
Halloween

Altered Wine Bottle

Today is the start of a new challenge over at Victorine Originals.
The best thing about this challenge is the fun things of Halloween
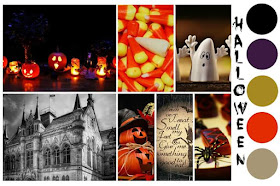
Here is our Awesome and fun Mood Board


Such a spooky cool board.
Well today I decided to step outside the box once again and alter a bottle. 
I used Victorine Originals
Oh.. These are the cutest stamps for Halloween!!! 
Here is my bottle


I am adding a few different pictures as the bottle looks different in different light. 
As you know, Halloween is always a little darker, so it only seem fair to add a few pics using flash in the dark, right? 


I started out by cleaning the label off the bottle. I then let it dry over night. 
I used 3 different colors of spray paint.
I started with black, then purple and blue.
I kept alternating the colors.
I did two coats and let dry.
(Note to self: always check the inside of the bottle to make sure the paint is dry before Altering. This will help you from pouring paint in your lap while using a stencil)

Ok, I laughed too. But I did have a nice dark stain on my leg from the paint for a bit and not to mention those poor pants. 
Oh well. 

I started by using the mummy and ghost stamp. Its not as easy to stamp on glass as you think. 
Your stamp will slide and since the bottle is curved, you have to hit it just right. 
I've learned if you start with the edge farthest away from you touch it to the bottle and go in a rolling motion towards you, it tends to help. 
But, I'm not gonna lie, I stamped each image about 6 or 7 times before it finally was right. 
Baby wipes are my best friend in these moments. 
After my images were on, I took my stencil and taped it to my bottle.
I then took 2 different colored inks and stamped on the stencil. 
I also added a few other spots just holding the stencil. 
Its times like these, you would like to have more hands.  But I managed.
I then added a cool chain and some feathers and of course a sentiment. 
This sentimemt is in the Halloween Kids stamp set.
So cute, right?


Heres the board again


Remember you can use anything from this board to get inspiration.
Use a photo, an item in the photo, a color or two or three. Or even the theme
Halloween.
Plenty to choose from and I bet you have been making Halloween creations already.
So what are you waiting for? Go link up your new projects now.
You have 2 weeks.

Thanks for stopping by
Hugs
Amy

Products used:
Victorine Originals: Halloween Kids Set
Ranger-Dylusions Triangle stencil
Bo Bunny: Fright delight sticker combo
(stamped sentiment on this)
Prima: chalk ink
Archival pearlescent sky blue
Spray paint, feathers and chain from my stash.